
Stripe payment Integration in Rails
Here is the simple way to integrate stripe into rails application, If you ever need to process credit card payments through your Rails applications you should take a look at Stripe.
Stripe is a payment gateway that is easy to set up and which is very developer friendly. It only charges fees on a per-transaction basis and these are very reasonable. There are no monthly fees or other hidden costs. (By the way we’re not being paid to say this.)
Stripe is currently only available in the United States so you’ll need an account at a U.S. bank if you want to use it in your applications. International support is being worked on, however, and should be available soon. This doesn’t mean that you can’t bill international customers, the only restriction is that the seller must be in the U.S.
1) create stripe account at Stripe
2) add gem to gemfile =>
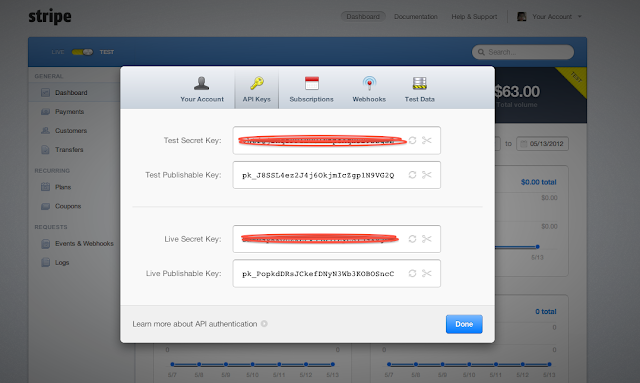
gem 'stripe' 3) create config/initializers/stripe.rb and add follwing lines (stripe keys) to it
Stripe.api_key : your_stripe_api_key
STRIPE_PUBLIC_KEY : your_stripe_public_key
You will get these keys from your stripe account
4) add these 2 lines to layouts/application.html.erb
  <%= javascript_include_tag "https://js.stripe.com/v1/", "application" %>
  <%= tag :meta, :name => "stripe-key", :content => STRIPE_PUBLIC_KEY %>
this will add Stripe’s Javascript API and set stripe publishable key
then create form for payment:
<% form_tag(your_payment_path, :method=>'post',:id=>"stripe-form") do %>
  <div class="field">
    <%= f.label :email %>
    <%= f.text_field :email %>
  </div>
  <div class="field">
    <%= label_tag :card_number, "Credit Card Number" %>
    <%= text_field_tag :card_number, nil, name: nil,:class=>'credit-number' %>
  </div>
  <div class="field">
    <%= label_tag :card_code, "Security Code on Card (CVV)" %>
    <%= text_field_tag :card_code, nil, name: nil,:class=>'credit-security' %>
  </div>
  <div class="field">
    <%= label_tag :card_month, "Card Expiration" %>
    <%= select_month nil, {add_month_numbers: true}, {name: nil, id: "card_month",:class => "card-expiry-month"} %>
    <%= select_year nil, {start_year: Date.today.year, end_year: Date.today.year+15}, {name: nil, id: "card_year",:class => "card-expiry-year"} %>
  </div>
<% end %>
<div id="stripe_error">
  <noscript>JavaScript is not enabled and is required for this form. First enable it in your web browser   settings.
  </noscript>
</div>
make sure these payment information should not get saved in your database, Next, we’ll need Stripe’s Javascript API:
then add following javascript to handle payment form request to stripe,
function stripeResponseHandler(status, response) {
  if (response.error) {
    $("#stripe_error").text(response.error.message);}
  else {
    var form$ = $("#stripe-form");
    var token = response['id'];
    form$.append("<input type='hidden' name='stripeToken' value='" + token + "'/>");
    form$.get(0).submit();
  }}
  $(document).ready(function() {
    Stripe.setPublishableKey($('meta[name="stripe-key"]').attr('content'));
    $("#stripe-form").submit(function(event) {
      $('.signup-button').attr("disabled", "disabled");
      Stripe.createToken({ number: $('.credit-number').val(),
                           cvc: $('.credit-security').val(),
                           exp_month: $('.card-expiry-month').val(),
                           exp_year: $('.card-expiry-year').val()
                         }, stripeResponseHandler);
    return false;
  });
});
5) then on submitting form create stripe customer, that will make user to get subscribed to plan with id ‘stripe_plan_id’.
To create a new plan, go into the dashboard, then, into plans, and, from there, there’s a nice little “wizard” that’ll walk you through the process. you can specify a trial period for your users, so, if you want them to have 15 days free, you just have to set it up on the dashboard – no code needed!
Stripe::Customer.create(email: users email , card: params['stripeToken'], plan: stripe_plan_id)after creating customer stripe will send stripe_customer_token. Make sure u store this token in database associating to that particular user, in order to access stripe customer associated with particular user registered in your application.
6) In order to handle stripe errors you can check out this link https://stripe.com/docs/api?lang=ruby#errors
7) Next thing you will need to add (as per your application’s requirement) catching stripe events which are sent by stripe on every transactions you can check all types of events here- https://stripe.com/docs/api?lang=ruby#event_types
8) in your stripe account add webhook url as http://your-url/stripe_events
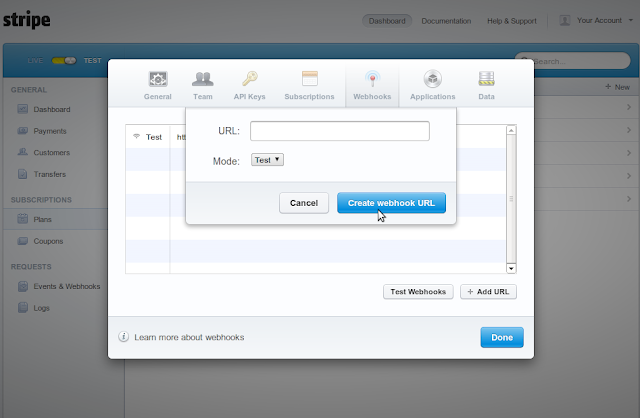
then in routes.rb
match "/stripe_events", :to => "events#stripe_events", :as => :stripe_events, :via => :postand now you can catch stripe events in events_controller/stripe_events
class EventsController < ApplicationController
  protect_from_forgery :except => [ :stripe_events ]
  def stripe_events
    # params['type'] will give u type of stripe event
  end
end
using these events you make the changes in your application like activating/deactivating users based on whether payment is done or not.
9) If in case payment fails due some reason for subscription, you can manage it on stripe as shown in following image

10) or you can also use ‘stripe_event’ gem , that will also provide a way handle stripe events.